An orchard is a natural resource in which fruit is picked.
ABOUT THAT ORCHARD[]
You can profit well from picking fruit. This is your comprehensive guide. First of all what kind of ladder have you purchased? If none you can still pick many fruit on the ground and even some blue on the trees. This depends on your intelligence and strength.
Second, remember the market as this will determine whether you see the higher or lower end of the yields. If fruit is selling and quantity is under 10 at the days reset the yield will be high. You may even see 250% on the yellow spots. Is it not selling? Then you will see the lower yields.
You can move from fruit to fruit on the map to find the best yield. As with fishing if you have 195% yield this means you will receive one fruit tomorrow and you will have 5% yield left over. So you have 5% of a fruit towards the next time you pick. You need intelligence to make many choices. For example: Number of moves used 8/10. This means you have two choices of fruit spots left. If it says 10/10 then you have used your allotted choices for the day. You can not move to another place. So, if you have 0-2 IP then you can try 2 spots. (IP=Intelligence)
Stats - Image by UrShak
3-5 IP = You can try 3 spots
6-8 IP = You can try 4 spots
9-11 IP = You can try 5 spots
12-14 IP = You can try 6 spots and so on . . .
You need Strength to advance to the better positions on the trees which are shown by colored spots on each tree.
COLOR SPOTS ON TREES YIELD[]
This is where you need Strength and then Ladders as you advance. You need at least 10 Strength points (SP) to use a Small Ladder. You need a Small Ladder to reach the red and some of the blue squares. You will have to buy a Large Ladder to get at the top spots on the far right.
The sooner you gain 20 Strength and at least 5 Intelligence and acquire a Large Ladder, the better you will profit from picking fruits. People do earn really well with a minimum of 5 Intelligence, 10 Strength with a Small Ladder. Remember intelligence gives you chances to pick. Strength lets you pick higher.
(Note: I have tested it. I was able to pick fruit from a blue circle without a ladder. -Edwardfarmer-)
Click to Enlarge * To Find A Specific Fruit - Look at the Bottom of Your Browser
PICKING A SPECIFIC FRUIT[]
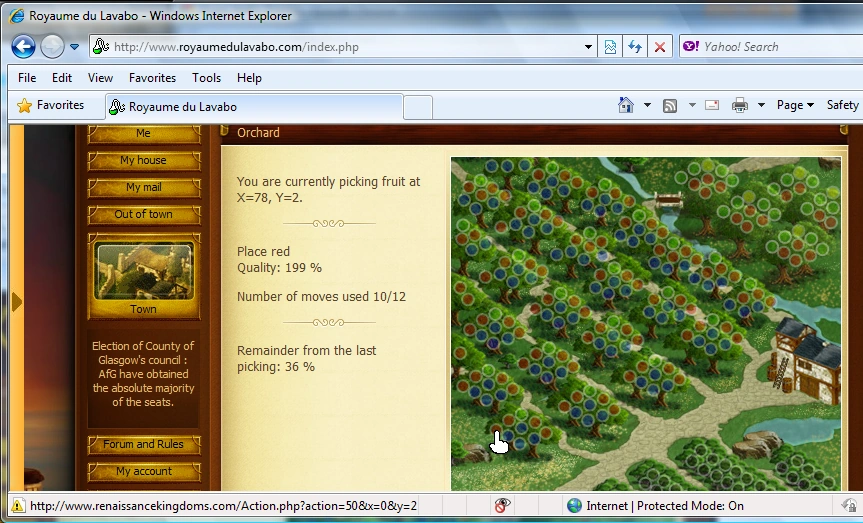
So what if a friend of yours gives you a number where you can find a good yield of fruit? If you are using Internet Explorer or Mozilla Firefox you can see the maps fruit locations. Use these when looking for a specific placement on the map. (See the note bottom left that says: [http:// http://www.renaissancekingdoms.com/Action.php?action=50&x=0y=2]. This means that you are choosing fruit at X=0, Y=2)
CATULLUS' FRUIT PICKING GUIDE[]
The main reason for posting this is that I wanted to finally see a guide that included everything: an explanation of all that someone picking sees, a basic step-by step how-to guide, and some of the tricks that people have discovered along the way. Once the time is right, if you haven’t visited the orchard, you’re missing out on one of the best ways to earn money in town. I’ve had great luck in the orchard, and it would be nice to see more of us benefiting from one of the best opportunities that we’re been given in this fine town. So without further ado . . .
Part 1: Terminology and Some Initial Thoughts Selling price: My fruit has always sold immediately at 10 pounds. Often, it doesn't take long for fruit at 10.50 to sell.
Yield (or quality): When I say that something yields 120, it means that in one day you will pick 1.2 fruit at that spot. If something yields 225, it means that in one day you will pick 2.25 fruit there. The game refers to this as quality.
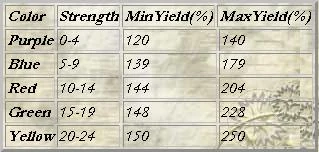
No Ladder: You can only pick the purple fruit. These will yield between 120 and 140. Even if you get a 140 yield, you need to sell this fruit for more than 12 pounds to earn minimum wage 15 pounds.
Small ladder: These cost between 20 and 25 pounds and you need 10 strength to use one. Small ladders allow you to pick the blue and red fruit. Blue fruit yield between 139 and 179 per day. Red fruit yield between 144 and 204 per day.
Large ladder: These cost between 70 and 80 pounds and you need both 20 strength and 5 intelligence to use one. Large ladders allow you to pick the green and yellow fruit. Green fruit yield between 148 and 228 per day. Yellow fruit yield between 150 and 250 per day.
Moves: Think of moves as the number of areas you can test to find the highest yield. Moves are based on intelligence, so the higher your intelligence, the more moves you get (or the more places in the orchard you can try out). At 0 to 2 intelligence, you get 2 moves (or you can try out two spots). If your intelligence is between 3 and 5, you can try out 3 areas. For every 3 additional points of intelligence, you get another move.
Part 2: Earnings and that First Ladder Purchase As mentioned above, the purple fruit don't pay enough to be worth picking. This means that, your first step to picking is buying a ladder. If you want to just try things out as cheaply as possible, buy yourself a small ladder as you’ll earn between 14.5 and 21.5 pounds per day. If you’re ready to enjoy the best that the orchard has to offer, be brave and buy that large ladder - you’ll earn between 15.5 and 26 pounds per day. Once you get a ladder, go to home > your inventory … and click ‘use’. When you click home again, there will be a note under your stats section saying: “you are using a (big or small) ladder”. By the way, pay attention to that note on throwing your ladder away – you don’t get a chance to confirm it, and a few players have thrown away perfectly good ladders by accident Ok!!! what are you waiting for, head to the orchard and try that ladder out. Click on the orchard, and pull up that screen.
Part 3: The Orchard There are two main parts to the orchard screen. There is a column on the left that contains all of your picking information, and the (larger) main picking screen. The picking screen: On the bottom right of the picking screen, are all of the purple fruits. Don't forget, these low quality fruit picking spots are just for visitors that really want to share in a small part of the joy that us professional pickers experience daily. Across the path (towards the top left of the picking screen), there are some taller trees that contain 3 or 4 blue fruits, 3 or 4 red fruits higher up, and one green fruit on the top. Across the diagonal path to the top right are the tallest trees, with 1 yellow on top, about 4 green fruits and 4 red fruit.
Picking Coordinates: If you hover over a fruit without clicking on it, say that furthest left purple fruit, you should see a message like www.renaissancekingdoms.com/action.php?action=50&x=71,y=0 at the bottom of your browser. Y represents the yield or quality of that fruit: 0 is purple, 1 is blue, 2 is red, 3 is green, and 4 is yellow. X is just a reference number – 71 means that it’s fruit number 71. If you happen to be sitting in the tavern and see another picker visit, the coordinates are a convenient way to tell that picker of places to avoid.
The picking statistics column: Ok, on to that column on the left. Before you click on a fruit circle, it will initially say something like “you are currently picking fruit nowhere” near the top, and “remainder from last picking ##%” at the bottom. Once you click on one of the fruit circles, that column will change and two more sections will be added. Go ahead and do it. (where numbers are helpful, I'll use my current picking info)
At the top, you'll now see: "you are currently picking fruit at X=#, Y=?. My current values are X=3, Y=4. And yes, these numbers correspond to what you saw at the bottom of your browser before you clicked on the fruit. Also, these coordinate numbers will never change, so that yellow fruit on the right edge of the screen will always be X=4, Y=4.
Below that, you'll see: Place (colour of fruit) Quality ??? (Mine is place yellow, quality 236). The colour will always correspond to that Y=? number from the coordinates, but the yield (quality) will differ by fruit.
Third down the list, you’ll see: Number of moves made/total ? / # (Mine is 1/9). # is the total number of moves that your intelligence allows you, and ? is the number of spots you’ve tried. In my example, I have 8 possible moves left to make, until it becomes 9/9.
Finally at the bottom, you’ll see: the exact same message that you saw before you clicked on a fruit circle. As I’m picking 236, I will harvest 2 fruits for that day, and my % remaining will increase by 36 at reset. Once this number goes over 100, you pick another fruit that day (and 3 fruit days are really exciting).
Part 4: Strategies and Thoughts
- 1: There are only 5 yellow fruits. If you are logging on immediately after reset, go ahead and try them. But if reset was a few hours ago, someone has probably already taken the good yellow spots. Don’t be afraid of the green fruit, I’ve had days where the quality (yield) of the green fruit has been higher in places than any of the yellow.
- 2: Even though I have 9 moves, I only think of this as 8 moves. Always keep one move back. While I’m trying those first 8 moves, I remember which two had the highest yields. With that final move, I go back to the highest fruit yield I found, and stay there. I made a mistake once, forgot where the 220 fruit was and clicked on a 160 – it was not a happy day. It would be just as bad to find that 220 fruit, and not be able to move back there.
- 3: If you find a good spot, stick with it. Although it’s wonderful to have 9 moves, last night my first click was on a yellow that yielded (quality) 236 and I stayed there. If you find a yellow fruit over 230, or a green fruit over 220, ignore the rest of your moves. Never forget that there may be other avid orchard pickers waiting to take the spot that you left behind. Yes, there have been days when I risked a 232 yellow fruit and found a better location, but those times are few and far between. Why risk a perfectly nice 230 yield when you might end up stuck with a 200?
- 4: One of the nicest things about the orchard is, you don’t have to wait to get confirmation. We’ve all seen that 19 pound job in the town hall, clicked on it and had to wait for 10 minutes (sometimes forever) to find out that we didn’t get the job. The orchard is like the militia – click on a tree, and that spot is yours.
- 5: To stat charisma costs about 21 pounds per day. Working in the orchard means that you can not only eat 2 fruits, but at least once a week you’ll get a third one that you can sell in the market. Level ones take note … this is a great way to raise your charisma cheaply.
- 6: Suan was very successful in the past using a small ladder. Although I prefer a large ladder (it’s a male pride thing), purchasing the small ladder will still earn you as much as you would in the mines – and as much as you would earn doing 0 stat work. Talk to her and I’m sure she’ll share her experiences with you
- 7: Although the fruit coordinates never change, the fruit yields change every day. That great spot you found yesterday that yielded 236, will usually have a different yield the next day. Feel free to pick a favourite spot, and check it first each day religiously, but don't forget to look elsewhere too.
Part 5: Some more numbers (this is me we’re talking about) Ok, so you’ve read all of this, and still aren’t certain as to why you should buy a large ladder. With the exception of one day or two days (out of about 30), I have always earned at least 22 pounds, and that was when I sold my fruit for 10 pounds. At level one, the best salary I could earn was 18-19 pounds, so the orchard paid me at least 3 pounds more per day. Not having to wait for the job confirmation was enough incentive for me, especially over 25 days. And in 25 days, I earned 75 pounds more than I would have by doing fieldwork, which more than paid off the cost of my large ladder.
Conclusion: Our town hall loves to export fruit, and you’ll earn good money by selling whatever you pick, as long as you pick smartly and with some patience. Any level one with 20 strength and 5 intelligence should definitely consider the orchard as a way to increase his/her charisma cheaply, and as a way earn as much as many level twos do in their workshops (ie more than any field job will ever pay). Level twos always want an alternative when their raw materials are priced too high, or their current market goods aren’t selling quickly enough – grab a ladder and join me. Any thoughts, notes and experiences would be greatly appreciated.